

How To Repair A Cabinet
Kitchen Cabinets: 9 Like shooting fish in a barrel Repairs
Updated: Jun. 26, 2022
Are y'all bugged by kitchen cabinets that don't work quite correct? Broken latches, loose door hinges, sticking drawers—are they driving y'all bonkers? Read on for easy fixes to these and other common cabinet issues.
Sometimes, information technology'south the little things that bulldoze us crazy in the kitchen. The loose door knobs, nicked door fronts and slamming drawers. If any of these audio familiar, check out this drove of quick and like shooting fish in a barrel kitchen chiffonier repairs. You'll notice simple solutions for many of the most common kitchen chiffonier woes.
You might also like: TBD
Adjust hinges on misaligned doors
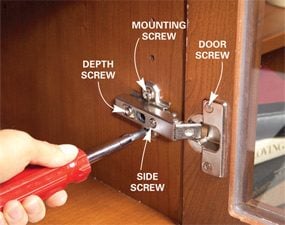
Suit depth and side screws
Euro hinges are designed for easy adjustment. If the door isn't flush with the doors side by side to information technology, arrange the depth screw. This screw moves the door in or out. Some depth screws move the door every bit you turn them. But with most, you take to loosen the spiral, nudge the door in or out and then tighten the screw. If your hinges don't have depth screws, start with the side screws. These move the door from side to side. In some cases, you have to loosen the depth spiral slightly to adjust the side screw.
Perfect one door earlier adjusting the 2d
If the door is flush and parallel with other doors but besides high or low, use the mounting screws to heighten or lower the mounting plates. Loosen the screws at both hinges, slide the door upwardly or down and tighten the screws. Some mounting plates suit by turning a single screw. Cheque the fit of the door afterward each adjustment. With double doors like these, perfect the fit of one door first, then marshal the other door.
Conform or replace bad latches
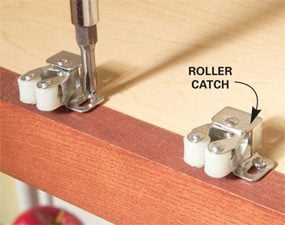
Replace and adjust the take hold of
Most newer cabinets have cocky-closing hinges that agree the doors shut. Others have magnetic or roller catches. A take hold of that no longer keeps a door closed is either broken or out of adjustment. Catches are fastened with two screws, so replacing a damaged catch is simple. Adjustment is just as simple, but you might take to readjust the catch a couple of times before you get information technology right. Loosen the screws, motion the catch in or out, and tighten the screws. If the door doesn't shut tightly, effort again.
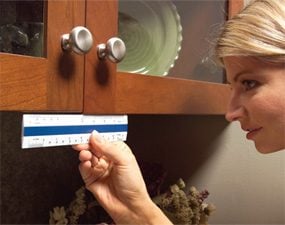
Add together bumpers to banging doors
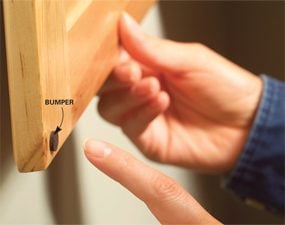
Place bumpers at top and lower corners
Tired of listening to those cabinet doors bang close? Peel-and-stick door and drawer bumpers are the solution. Get a pack of 20 at a home heart for $2. Make certain the back of the door is clean and so the bumpers will stick, and then place 1 at the peak corner and another at the lesser.
How to Fix Drawer Slides: Supplant worn-out drawer slides
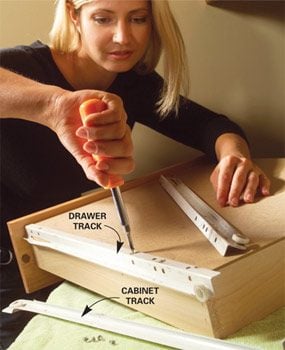
How to Fix a Drawer: Supersede with identical slides
If you find that slides are bent, rollers are broken or rollers won't turn fifty-fifty later lubricating, replacement is the best solution. To continue the project simple, buy new slides that are identical (or about identical) to the quondam ones. That way, replacement is an easy matter of unscrewing the old and screwing on the new. Remove a drawer track and a cabinet rails and accept them shopping with you. You'll observe slides at dwelling centers for $5 to $15 per drawer.
How to Fix a Drawer: Lubricate sticking drawers
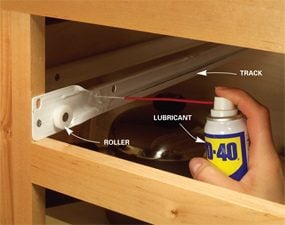
How to Gear up Drawer Slides: Spray lubricant on tracks and rollers
A few minutes of cleaning and lubricating tin can make drawer slides glide almost like new. Offset by removing the drawers so you can inspect the slides. You can remove most drawers past pulling them all the way out, then either lifting or lowering the front of the drawer until the wheels come up out of the track. Wipe the tracks make clean and glaze them with a light spray lubricant. Also lubricate the rollers and make sure they spin easily.
How to Fix a Drawer: Repair a broken drawer box
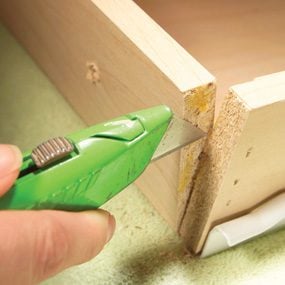
How to Set a Drawer: Remove fasteners and old glue
Don't put up with a cleaved corner joint on a drawer. Set up it before the whole drawer comes autonomously. Remove the drawer and then remove the drawer front from the drawer box if possible. Most fronts are attached past a couple of screws inside the box. Remove nails, staples or screws from the loose articulation and scrape abroad sometime mucilage with a utility knife.
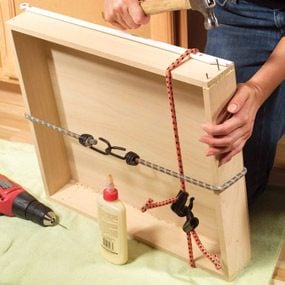
Predrill nails holes and gum the joint
Predrill ane/sixteen-in. holes for nails, utilise wood glue to the joint and nail it together with 1-1/2 in. end nails. Forest glue volition make a strong repair if there'due south forest-to-wood contact at the joint. If the forest at the joint is coated, use epoxy instead of wood glue.
Gum loose knobs
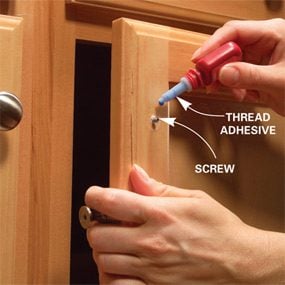
Glue knobs in place
Whatever handle or knob that comes loose once is probable to come up loose again. Put a permanent end to this problem with a tiny drop of thread adhesive similar Thread Lok (about $3 at abode centers). Don't worry; if you lot want to supersede your hardware sometime in the future, the knobs volition still come up off with a screwdriver.
2 means to make full stripped screw holes
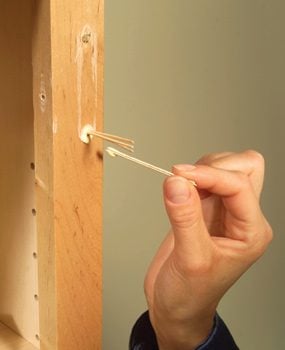
Fill holes with toothpicks and mucilage
If a screw turns but doesn't tighten, the screw pigsty is stripped. Hither's a quick remedy: Remove the screw and hardware. Dip toothpicks in gum, jam equally many as you tin can into the hole and suspension them off. Either flat or round toothpicks will work. Immediately wipe away glue drips with a damp cloth. Yous don't have to wait for the gum to dry out or drill new screw holes; just go alee and reinstall the hardware by driving screws right into the toothpicks.
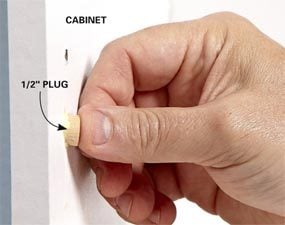
Repair a chiffonier hinge screw hole with a plug
Cabinets made from particleboard work not bad in utility and laundry rooms, and they're fairly inexpensive. Simply particleboard has a major weakness—it doesn't hold screw threads very well. So if you swing the door open up too fast, the strength can rip the hinge screw right out of the chiffonier wall. Don't worry; the fix is easy and inexpensive. Here's how to patch things up. Y'all'll demand a bottle of woods glue, a 1/2-in. drill bit and a package of i/2-in.-diameter hardwood plugs (sold at home centers).
Showtime by removing the hinge screws on the cabinet and flipping the hinge out of your fashion. If the accident pulled out a large clamper of the particleboard, glue it back into place and let the mucilage set up before proceeding with the balance of the repair. Drill out the stripped spiral hole to accept the plug. Next, fill the pigsty with forest glue and install the plug. Afterwards the glue dries, drill a pilot hole and install the new screw—you're all prepare.
Touch upward nicks and scratches
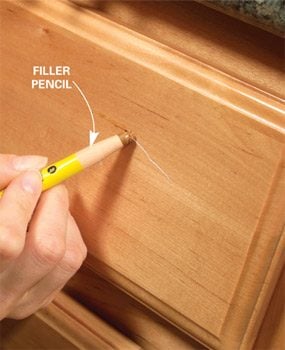
Utilize a stain-filled bear on-up mark
If y'all take shallow scratches or nicks, hide them with a stain-filled impact-upward marking. Dab on the stain and wipe off the excess with a rag. But beware: Scratches can absorb lots of stain and turn darker than the surrounding end. And then get-go with a marker that's lighter than your cabinet cease and then switch to a darker shade if needed. For deeper scratches, use a filler pencil, which fills and colors the scratch.
Originally Published: June 26, 2022
Source: https://www.familyhandyman.com/project/kitchen-cabinets-9-easy-repairs/
0 Response to "How To Repair A Cabinet"
Post a Comment